


Best Kayak Fish Finders


Standout Picks

Criteria Used for Evaluation
Advanced Features
One of the most important features of a kayak fish finder is the display. The resolution, pixels, size, and technology all come together to deliver you an, ideally, clear image of what's going on underneath you. You will want to look into how to colors appear on the screen and how well it functions in rough conditions.
Another important aspect of the screen is the backlighting. This is important at almost any time of day. If the sun is blaring down on you, it may be difficult to see the screen. Also, if you are out on the water at dawn or dusk, you may have the same problem if the screen isn't backlit or bright enough.
Portability
Having a portable fish finder is vital to success on a kayak. Some of these devices are small and portable enough to be held in your hand. This way, you could even use the device on a small boat or canoe. In a kayak, you won’t have the space to hold a large unit that requires bulky sonar units. A portable fish finder will also make it lightweight, allowing you to find all of the most elusive fish without having to add any additional weight to your kayak, which will help you row farther and faster in the long run, no matter how little weight you think you are adding at the time.
Visibility
When kayaking, you are going to be able to reach places that you wouldn’t otherwise be able to get to without spooking the wildlife. With that in mind, it is easy to see why it is so important to be able to see everything that is going on underneath your kayak. In some places, you will end up getting somewhere that lets you reach depths that few people have, but you’ll have to be able to see that deep. The most impressive depth visibility on our list comes from the Garmin Echo, with 1,750 feet. This is quite impressive for such a small machine. Most of the other devices on our list have a depth-visibility of around 700 feet.
Water Resistance
It should go without saying, but in a kayak there is a good chance that you will get wet, as well as your equipment. A good kayak fish finder will have the ability to stay waterproof through all of your excursions, no matter how intense they might get. Even if the device is waterproof, it is also important to check up to what depth it is waterproof. As with many things, it may only be waterproof up to 50 meters. After that, the water pressure becomes too strong and makes its way into the device and possibly ruins it. If you would be extra cautious, some fish finders come with the option of a waterproof case, similar to those of a Go Pro.
Top 10 Picks
1. Raymarine Dragonfly 7 Pro

For almost any type of fisherman, whether you are a weekend warrior or a professional fishing guide, this offering from Raymarine is one of the best. To start with, this model features a 7” color display that is designed to still be highly visible even in the brightest light.
Read moreAdvanced Features
Powering this device is a system of two sonars in one, called Dual-Channel CHIRP. One is a high-resolution fish targeting channel, while the other is an ultrahigh-resolution DownVision Channel that will develop a perfect look at the floor of the body of water. You won’t have to adjust this sonar either, thanks to the high-tech design. The CPT-DVS transducer is easy to install and has tilt and swivel features. Each device has built-in wifi so that you can easily share your favorite spots or images with friends.
Portability
Unfortunately, the dimensions of the device are not listed, but the screen is 7-inches. Reviewers have mentioned that the approximate size of the device is 7.7” by 7.7”. The included mount is short and can be placed almost anywhere. This a great device to use anywhere.
Visibility
Enjoy high-resolution tracking down to 600-feet thanks to Ultra Wide Chirp DownVision. The LCD screen delivers a sharp picture and is guaranteed to never fog up. The colors are always bright and the contrast is high.
Water Resistance
For your kayak, this is built to both IPX6 and IPX7 waterproof standards so that you know it is one of the safest for you.
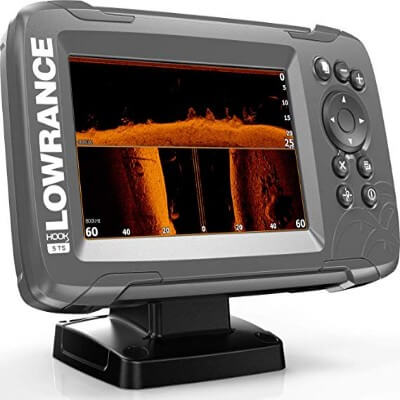
2. Lowrance Hook 2
Lowrance is one of the least talked about brands that you should know when you are in the market for a fish finder on your kayak. This newer model also comes with a new and brighter display that measures to 5” and in full color with LED backlighting.
Read moreAdvanced Features
This fish finder is great for any and all use. It features a high-resolution SolarMax display in full color. Additionally, it boasts not only DownScan but SideScan technology as well, thanks to the TripleShot Transducer. This technology allows you to see underwater 300-feet in each direction. Like many other models, it also has CHIRP technology to catch the sonar waves and give you a more accurate reading of what is going on underneath you.
This finder is ready to use right out of the box. It has an auto-tuning sonar system that requires no adjustments nor guesswork. It functions similarly to a smartphone and the screen is easily read, even in direct sunlight. This device comes equipped with the mapping of the inland U.S, including 4,000 lakes. If you need something more, there is an SD slot that you can use to upgrade or integrate new maps.
Portability
This particular model, with a 5-inch screen, weighs 3.68-pounds and is very portable. The dimensions of this product are 9” x 7.5” x 7.1”. You could easily use this finder on a kayak, small boat, or even for ice fishing.
Visibility
The screen of this model is impressive. It delivers a very clear photo of the oceans and is visible in the harsh sunlight and the darkness of early mornings and/or nights. You can rely on this screen to not fog up, also. If you prefer a larger screen, this device is also offered in 7”, 9”, or 12”.
Water Resistance
This finder has an IPX7 waterproof rating. This is the industry standard and should be enough for a trip on the kayak.
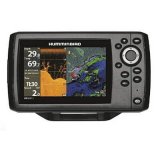
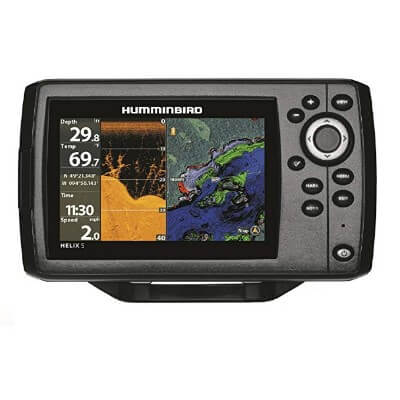
3. Humminbird Helix-5 Chirp
Humminbird has created yet another high-quality fishfinder with their latest Helix-5 model. This is one of the highest resolution screens on the market, with 800H x 480V and a 256 color display.
Read moreAdvanced Features
This is another model that features CHIRP digital sonar. This, paired with down imaging, gives you an incredible view on what is going on underneath you. With the added Switchfire technology, you can choose from “Max Mode” or “Clear Mode” to decide how much detail and thermoclines you would like to see.
There is a basic mount included that sticks well to flat surfaces. However, many customers have upgraded to a RAM mounting system for more flexibility.
Right out the box, this device is ready to go. With a built-in base map, this fish finder already knows where the buoys and marinas are.
Portability
The dimensions of this product, as listed on Amazon are 15” x 10” x 5”. The rechargeable battery lasts for about 16 hours, which is more than enough to get you through the day. This device is easy to mount and dismount, which makes it ideal for kayak use.
Visibility
With a 5” display, it is easy to see the screen. It features a 1,500NLT-brightness, which protects you from glares and makes the screen easy to see, even in the bright sun.
Water Resistance
This product is rainproof but we don’t recommend purposely taking it for a swim.
4. HawkEye Fish Trax 1
HawkEye brings an affordable option to this list. However, because of the price, you will be giving up a few features. For a minimalist, this is the perfect kayak fish finder.
Read moreAdvanced Features
Dual Beam Sonar technology is included with all FIshTrax devices. This is an adjustable system that allows you to tweak the system to your needs. You can use this technology in two different frequencies. 200 kHz brings you 200,000 sonar pulses each second, while 83 kHz brings you 83,000 per second. While some people have trouble reading the screen, there is an audible alarm that goes off to tell you when there are fish below you. The screen tells you the water depth and water temperature so that you always know what kind of conditions you are in and can drop the proper lure. The finder features a beam angle of 14-degrees and can detect fish down to 240-feet. This device uses 4 AAA batteries. There is no mount included with this fish finder, but there are a plethora of additional accessories for sale.
Portability
This handheld fish finder is one of the most portable devices on our list. It weighs only 10.2-ounces and the dimensions of the product are 6” x 3” x 2”. This is a great device to use on the boat, kayak, or even on the dock.
Visibility
The backlit screen is easy to see in the day or night and the device itself is simple to operate. As mentioned above, the HawkEye FishTrax 1 features a beam angle of 14-degrees and can detect fish down to 240-feet.
Water Resistance
This model boasts an IPX7 waterproof rating, which keeps it safe from rain or big splashes. If it were to be submerged, it would last no longer than 30 minutes, in less than 3 feet of water.
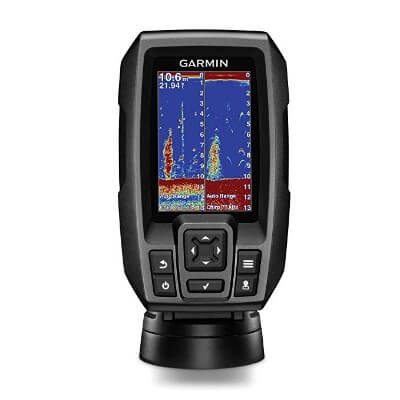
5. Garmin Striker 4
These little gadgets have become incredibly powerful over the years, but all of the new features and functionality that we've gotten has beefed up these devices more than ever before. So, as a result, these once small and compact gadgets are now big and beefy devices that can often take up more space on our boat than we would like. But you know what? All those features that the big and clunky fish finders include are pretty great. If only there was a way to get all these features in a clean, compact, and small form factor. Lucky for you, the Garmin Striker 4 makes all of that possible.
Read moreAdvanced Features
Here we have another great contender that features CHIRP technology, taking advantage of sonar frequencies and bringing you more accurate information. More than just a GPS, this Garmin features WayPoint Maps, where you can mark points that you have favorited, be it as guidance on your way home, or the dock of your favorite waterfront restaurant, or a shallow area to avoid. You will be able to see a great map, speed, arrival time, direction, distance, and depth all on one screen. The resolution of the display is an impressive 480 x 320.
Portability
This finder features a suction cup transducer which is great for travel and portability but maybe more a handheld item in your kayak. It weighs only 8-ounces and has dimensions of 3.6” x 1.6”x 5.9”.
Visibility
The display of the finder measures 1.9” by 2.9” and 3.5” diagonally. The colors are always bright and this device is great to use in sunlight or in the dark.
As for water visibility, it has a maximum depth view of 1,600 feet or 750 feet in saltwater.
Water Resistance
This device has a water resistance rating of IPX7. This makes the device waterproof, with minor stipulations. However, a couple of reviewers have noted that the screen fogs up at times.
Sources
- , The 6 Best Fish Finders For Kayaks Reviewed , Outdoor Guide
- , 8 Best Kayak Fish Finders 2019 – Portable or Not?, Buying Guide